3 Quick Ways to Verify Images on a Smartphone
Read this article in


This step-by-step guide explains how to do a reverse image search to check whether the photo you saw on social media is the real thing.
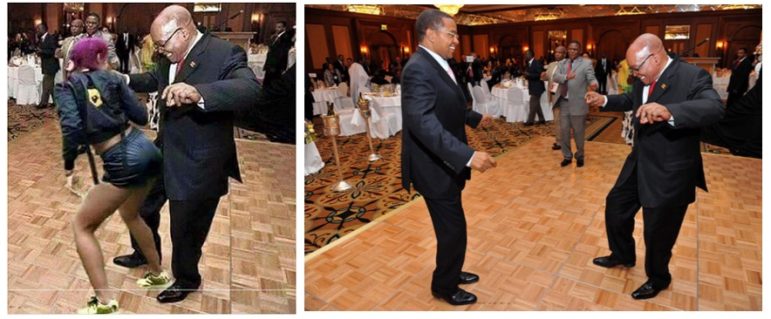
When a photograph of former South African President Jacob Zuma supposedly dancing up close and personal with twentysomething singer Babes Wodumo popped up on social media in 2016, gleeful South Africans shared it far and wide.
In fact, it was a photoshopped composite of two different pictures. The result was a perfect example of how misinformation usually has a grain of truth.
In this case, the former president’s reputation — as a ladies’ man who also danced on stage at political rallies with top musicians — might have lulled many into thinking it was genuine.
With rising awareness of “fake news,” people are more cautious of reflexively hitting share. But how can you quickly verify whether what you’re seeing is true, especially when you’re on your mobile phone? Luckily, there are many free go-to websites and mobile apps. Here are three useful ones to help keep the egg off your face.
TinEye
![]() TinEye is a free reverse-image search tool on steroids. Reverse-image search is like a search engine for photos, so you can find other places online where the same, or a similar, picture has been published.
TinEye is a free reverse-image search tool on steroids. Reverse-image search is like a search engine for photos, so you can find other places online where the same, or a similar, picture has been published.
TinEye finds the “most changed,” “oldest” and “newest” iterations of a photograph. Using this, you would have quickly discovered that the Zuma and Babes Wodumo picture was a Photoshop job.
It is a composite of two different pictures: one of Wodumo in concert and another of Zuma boogying during a gala dinner in Ethiopia in 2012 with former Tanzanian President Jakaya Kikwete.
How to Search with TinEye
- Save or download the picture you want to verify. Usually, you press and hold the picture on your screen until you see an option to save it. Or you can copy the web address of the picture you want to verify. (It must be the URL of the actual photo, not of the entire web page.)
- Navigate to www.tineye.com in your phone’s browser.
- Select “upload image” and search for the saved copy of the picture in your phone’s documents or picture gallery or paste the picture’s URL in the TinEye search bar.
- Select one of the images returned and then toggle between “your image” and “image match.” You will then see how the photo of Zuma and Wodumo was altered.
Google Reverse Image Search
The key things you’re looking for when doing a reverse-image search are when a picture was first used and where and when the event it portrays happened. It also helps you check whether the picture comes from a credible source.
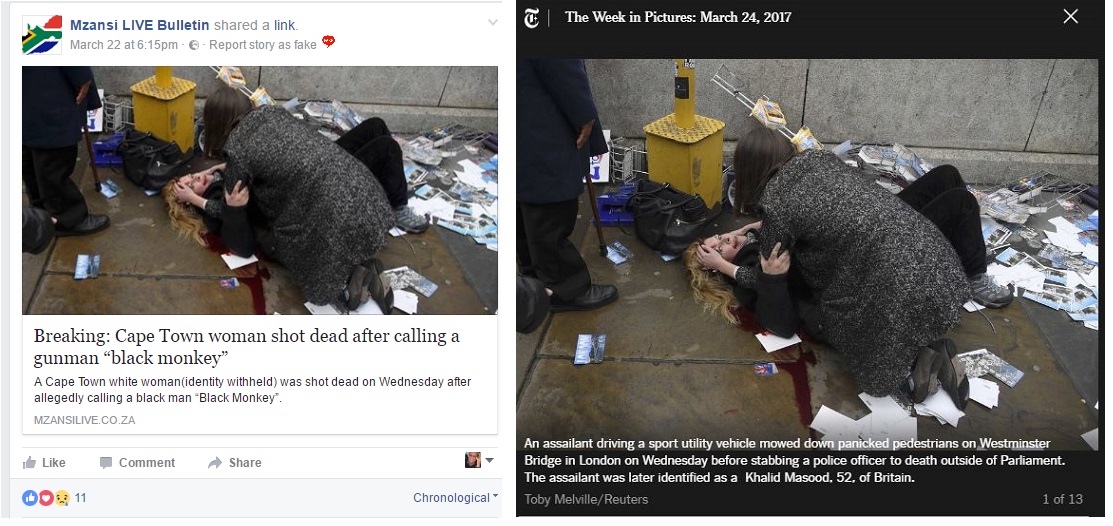
When a picture popped up on Facebook claiming a man had shot a woman for calling him a “black monkey,” social media swallowed it whole. The first red flag was that the post was pushing a story from the infamous MzansiLive website.
I was away from my desk when I spotted it on Twitter, so I took a screengrab of the picture and then did a reverse image search on my phone. The picture, it turned out, was genuine – except it was taken after a motorist mowed down pedestrians on Westminster Bridge in London.
How to Use Google Reverse Image Search
- Save or download the picture you want to verify. Otherwise, you can copy the web address of the picture you want to verify. (It must be the URL of the actual photo, not of the entire web page.)
- Navigate to https://images.google.com.
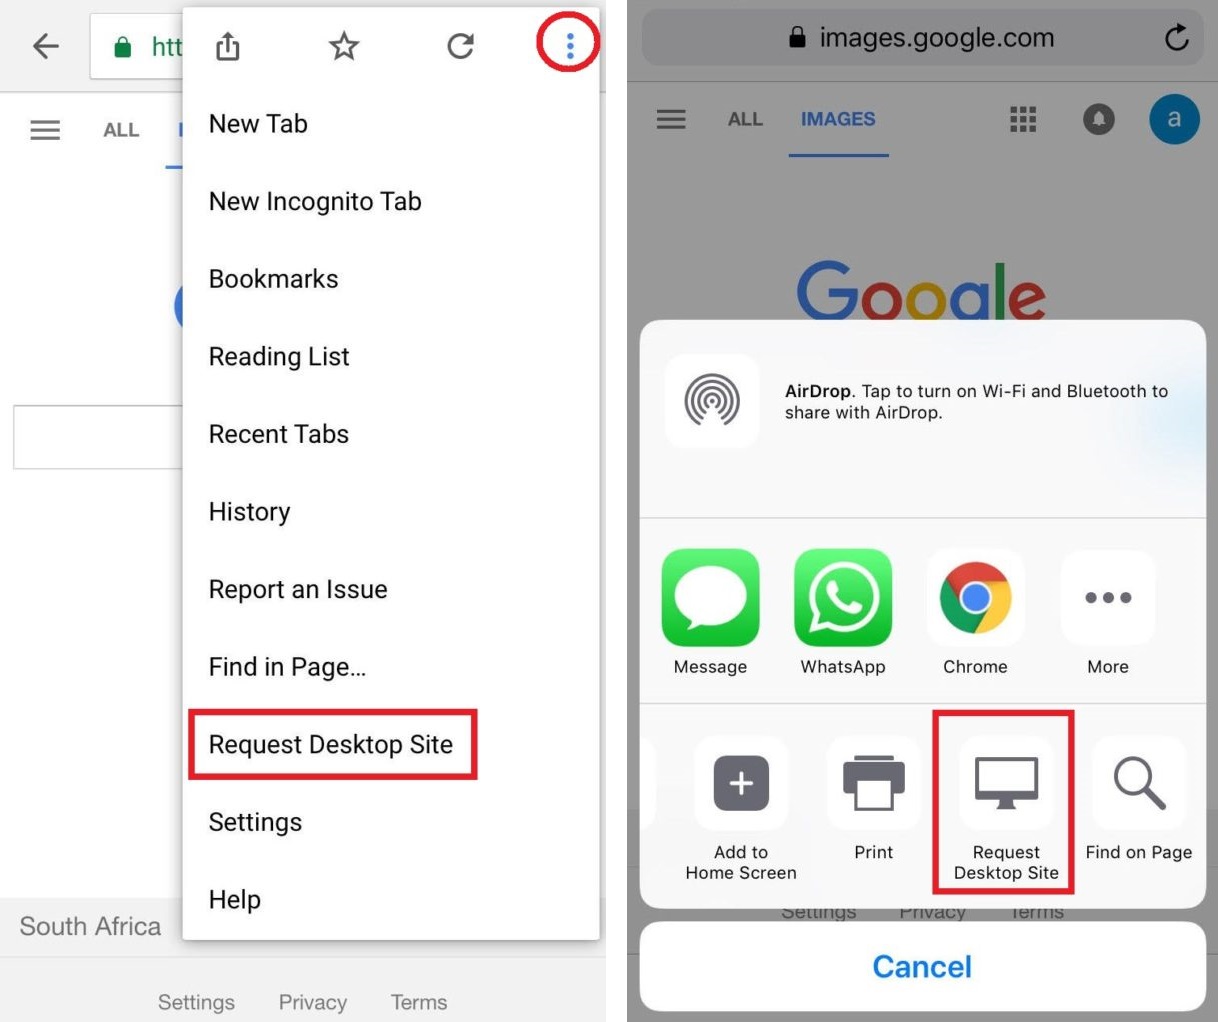
- Make your way to the browser menu, scroll down and select “request desktop site.” In Google Chrome, the menu is found by pressing on the three dots at the top right of the screen. In iOS Safari, it’s in the centre at the bottom of the screen.
- Press the camera icon in the search bar.
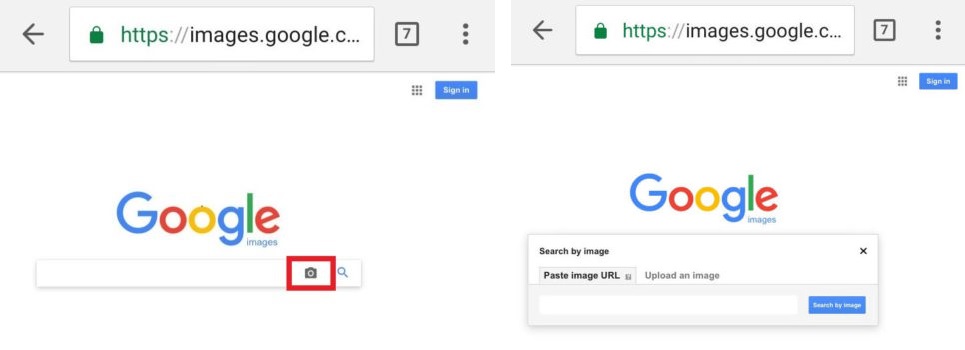
- You now have two options: Paste the URL of the photo you want to check in the search bar. Alternatively, select the “upload an image” tab to upload the image from where you’ve saved it on your phone.
- Check the results for when and where else the image was used. If you go back far enough, you should be able to find where it was originally used and, possibly, the owner of the copyright to the picture.
Tip: If you are using Google Chrome as your default mobile browser, do a long press on a photo you want to check and a drop-down menu will appear. Select “search Google for this image” to initiate a reverse image search.
Fake Image Detector
 Like Google Reverse Image Search and TinEye, this tool is good for a quick reverse-image search. But it also has a useful function that allows you verify a photo or poster of which you’ve taken a picture.
How to Search with Fake Image Detector
- Download and install the Fake Image Detector app from the Chrome or Firefox app stores.
- Open the app and select one of two options: Choose from gallery — This provides access to places where photos are stored on your phone so you can perform a reverse image search. Choose from recent images — Select the photograph you’ve taken of a poster or a picture in a magazine or newspaper.
Fake Image Detector also allows you to check the Exif data of the photo. This can include the date and time when the picture was taken, the location and sometimes even the type of camera or phone that took it as well as the name of the owner.
Tip: Unfortunately, Fake Image Detector is only available for Android devices. Try Veracity – Reverse Image Search, which is available free in Apple’s App Store, for iOS devices.
Tips for Verifying Images
This guide to fact-checking photos by FirstDraftNews is aimed at journalists, but it contains loads of practical tips. Ask yourself:
- When was the picture first used? (Does it predate the one you are verifying?)
- What is the context in which it was used? (Old pictures from Syria or Afghanistan sometimes pop up during flare-ups in Gaza, for example.)
- What are people wearing? Do their clothes fit the style of the country where the picture was supposedly taken?
- What is the weather like in the photo? Deep snow in a picture taken at the height of the northern summer suggests the picture is either old or from somewhere else.
- Look for road signs, shopfronts and billboards. Does the language fit the photo’s supposed location?
- Look for inconsistent lighting in the photo. Are objects close to one another lit in the same way, or do some seem brighter or duller? If so, there’s a good chance they’ve been added or digitally manipulated.
- Look for distortions along the edges of people or objects. These are usually easy to spot and indicate when a picture has been poorly manipulated.
- There are often slight variations in light, color and shades in nature. If a software program has been used to alter a photo, large areas might be an identical color in areas when something has been added or removed.
- Check thrice before you tweet or post.
- If it seems far-fetched, like this woman who claimed to have had a third breast implanted, it probably is.
- If someone posts something that is old or “fake” tell them, but be polite and avoid being a troll.
- Some of this is on you: you can either be part of the “fake news” problem, or you can be part of the solution.
This guide was researched by Raymond Joseph for Africa Check, the continent’s leading fact-checking organization. Read it on their website here. It is reproduced here with permission.
 Raymond Joseph is a freelance journalist and journalism trainer. He is a former ICFJ/Knight International Journalism Fellow and offers training to journalists in online and social media content verification. He is also as an assessor for the Poynter-hosted International Fact-Checking Network.

This work is licensed under a Creative Commons Attribution-NoDerivatives 4.0 International License
Republish our articles for free, online or in print, under a Creative Commons license.
Republish this article
This work is licensed under a Creative Commons Attribution-NoDerivatives 4.0 International License
Read Next
Investigative Techniques Reporting Tools & Tips
How to Verify Bystander Video
From the Minneapolis shootings to the Guthrie kidnapping, visual investigation skills are now mandatory. Here’s how to do it.

News & Analysis Reporting Tools & Tips
How Journalism Groups in Africa Are Building AI Tools to Aid Investigations and Fact-Checking
These organizations are developing AI tools and resources that can be used to tackle misinformation, improve data reporting, and help with the storytelling process.

Case Studies Reporting Tools & Tips
How Tai Nalon Creates New Tools to Investigate and Fact-Check Brazilian Politics
For GIJN’s My Favorite Tools series we spoke with Brazilian journalist Tai Nalon, executive director and co-founder of the fact-checking website Aos Fatos, who now leads an award-winning reporting team of nearly 20 people.

Methodology Reporting Tools & Tips
10 Simple Data Errors That Can Ruin an Investigation
At the 2023 NICAR conference, GIJN talked with several data journalism experts and learned 10 simple data journalism errors to avoid that could ruin your investigation.