Four Quick Ways to Verify Images on a Smartphone
GIJN has updated our popular step-by-step guide on verifying images to check whether the photo you find on social media is the real thing.
Given how common fake images have become online, it’s fortunate that there are a number of simple-to-use free tools — including TinEye, Google Reverse Image Search, Photo Sherlock, and Fake Image Detector — that you can use to check the source of a picture, and whether it has been manipulated.
One Billboard, Four Countries, Four Messages
There are more ways to sow misinformation or disinformation than merely sharing a fake image. Digitally manipulating a photograph is another method used to mislead people, often to push a political agenda.
For instance, when Belgium’s Médecins Sans Frontieres erected a billboard in Liberia sometime in 2006 or 2007, it aimed to tell rape survivors where they could seek treatment. Recently, an edited, disturbing photo of that billboard circulated on social media, falsely suggesting, as noted in this AFP Fact Check, that Black people could murder White people in South Africa without consequences — and with the support of the African National Congress-run government.
It wasn’t the first time the image has been altered. Snopes first wrote about the same billboard in 2016. In this disturbing version, the victim on the billboard was a blonde, white woman who was supposedly being assaulted by Black men. The implication this time: Finland’s Green League political party was promoting a dangerous, pro-immigrant agenda that would leave white women under attack by foreigners. The same altered billboard image was also shared online by anti-immigrant groups in Sweden — the victim’s race also changed to white, and it included wording similar to that on the manipulated Finnish billboard.
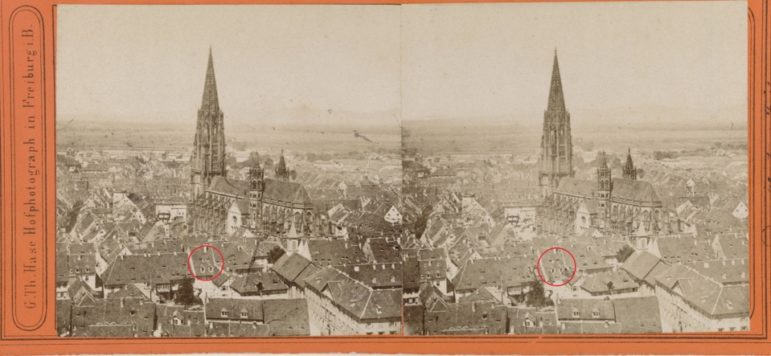
So, we have one sign with four different messages. But if you look beyond the actual sign, at the background, it is clear that all share several things in common. The same man in the foreground, the same vehicles in the background, and the same pole carrying electrical cabling on the right of the billboard are visible in all four different billboards. But how do you begin to verify which is the original?
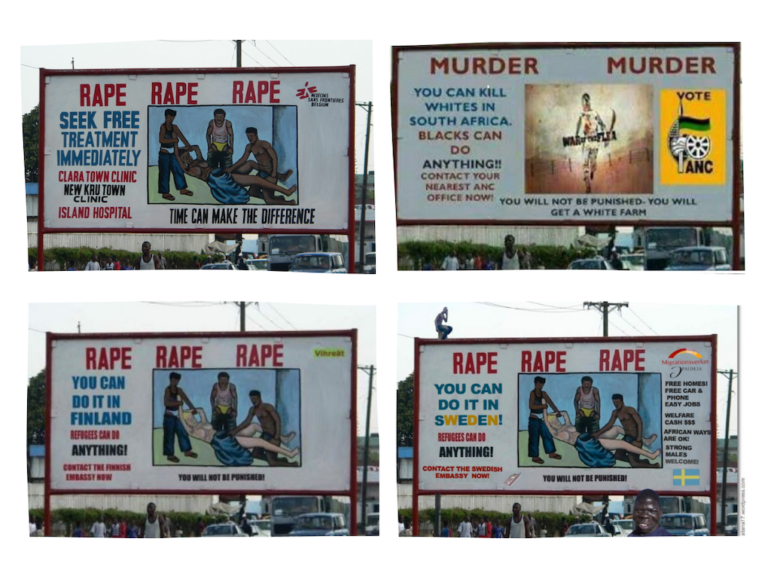
The images above — some disturbing — all come from the same photo of a billboard, originally erected as part of an anti-sexual abuse campaign in Liberia by Médecins Sans Frontieres. Clockwise from upper left: the original photo of the billboard in Liberia; altered image circulated on WhatsApp in sub-Saharan Africa; altered images with racist, anti-immigrant messages in Sweden and Finland. Images: Screenshots
Tools that Do the Heavy Lifting
Sometimes verifying a photo, video, or post on social media can be as simple as an online search. You may well find that a credible fact-checking organization has already done the job for you.
Tip: Start with using a basic Google search for keywords you’d like to check and add “fact-check.”
TinEye
TinEye, a free and powerful reverse image search tool, helps find other instances online where the same, or a similar, picture has been published.
It’s my favorite go-to tool because, unlike other reverse image search tools, it has additional searches for the “most changed,” “oldest,” and “newest” iterations of a photograph. Using “most changed” and searching through the results for the original Liberian rape billboard turns up the various versions of the billboard, which you can compare with the one you’re investigating.
“Oldest” often helps identify when a photo was first used. If the first or other uses predate the one you’re checking on, it means that something is wrong.
It’s important to remember that TinEye, like other reverse image search tools, can only find photos posted online. So if a picture was taken by someone and posted on, for example, a WhatsApp group only, and never shared online, you won’t get a hit.
Note: You can find instructions on how to add a website using Safari to your home screen using an iPhone or iPad here. If you’re using Chrome on your Apple device follow these instructions.
How to Search with TinEye
- Open TinEye in your phone’s browser. On Chrome and Firefox for mobile, press the three dots on the top or bottom right of your screen. In the dropdown menu press “add to home screen,” edit to read “TinEye,” and press “add.” You now have a shortcut to TinEye on your phone’s home screen.
- Save or download the picture you want to verify by pressing and holding on the photo you want to check until a dropdown menu appears. Press on the save option. You can also do a screengrab of the picture and save it to the photos folder on your phone. Otherwise, copy the web address of the picture you want to verify by tapping on the photo and copying the URL. Remember, it must be the URL of the actual photo, not of the entire web page on which it appears.
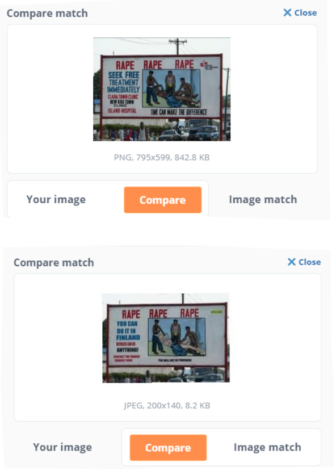
Image: Screenshot
- Open TinEye on your home screen. You now have two options. You can select “upload image” and search for the saved copy of the picture in your phone’s picture gallery, or paste the URL of the photo into the TinEye search bar.
- Once the search is completed, click on the “sort by” box on the top left and choose one of the options in the dropdown menu — oldest, most changed, etc. Choosing the “most changed” option and using the billboard example above, look for instances where the original Liberian public service billboard has been amended to suit the different agendas. Now work through the images returned and click on a photo you want to view.
- Toggle between “your image” and “image match” to see how the photo has been altered.
Google Reverse Image Search
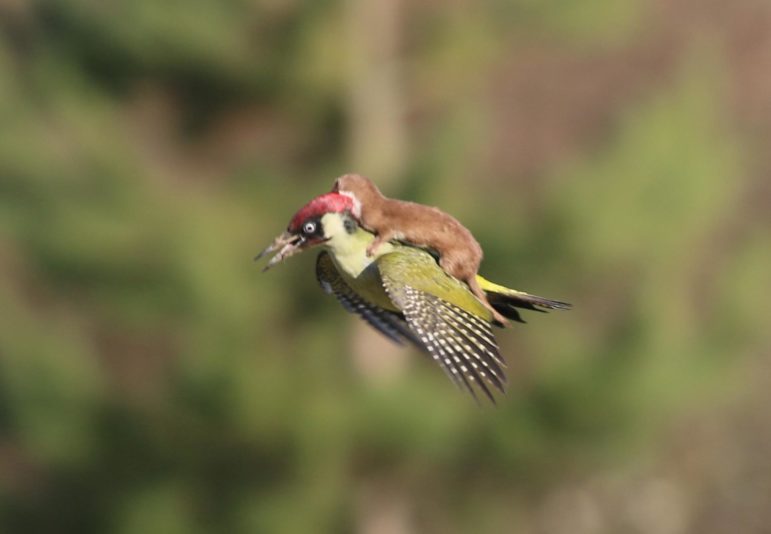
The key information to look for when doing a reverse image search is when a photo was first used, in what context it was used, the source of the photo, and whether the source is credible.
A few years ago, a photograph of a weasel clinging to the back of a flying woodpecker went viral on social media, with many people making their own memes of the amazing image. It seemed too good to be true, and had all the hallmarks of a manipulated, fake image. But a Google Reverse Image Search revealed that it was absolutely true, and part of a series snapped by an amateur photographer. One of the hits from the search was a BBC interview with the photographer himself, explaining how he shot this incredible once-in-a-lifetime photo.
Tip: The same search, using TinEye’s “most changed” function, would work well for this.
How to Use Google Reverse Image Search
- Add https://images.google.com to your home screen using the same “add to home screen” method, as above, for TinEye.
- Save or download the picture you want to verify or copy the web address of the picture you want to verify. Again, it must be the URL of the actual photo, not of the entire web page.
- If you haven’t saved a shortcut to your home screen, open https://images.google.com in your phone’s browser.
- Open the browser menu and in the dropdown menu select “Request desktop site.” In Google Chrome, the menu is found by pressing the three dots at the top right at or bottom right for Firefox. In Safari, it’s in the center at the bottom of the screen.
- Now press the camera icon in the search bar.
- You now have a few options: Paste the URL of the photo in the search bar, or select the “upload an image” tab to access the image from your phone.
- The tool has done the heavy lifting. Now work through the results to check for when and where the image may have been used, as well as the context of any previous uses. If you go back far enough you should be able to find when it was first used and who owns the photo’s copyright.
Tip: If using Google Chrome as your default mobile browser, long-press on a photo on a website and a dropdown menu will appear. Select “search with Google Lens” to do a reverse image search. (Older versions may say “search Google for this image.”)
Photo Sherlock
I particularly like the Photo Sherlock app because, apart from being free, it allows you to do a reverse image search using three different search engines: Google, Yandex, and Bing. It also has the option to check the provenance of a poster or a photograph in a magazine or newspaper. First, download the app to your mobile phone, for Android or iPhone.
How to Use Photo Sherlock
Once you open Photo Sherlock, you will have the option to:
- Take a photo — of a poster or picture in a magazine or newspaper — by clicking on the shutter icon.
- Upload a picture by pressing on the white square with two black triangles. This will bring up several different folder options, including “gallery,” [Google] “Drive,” and “files,” which will give access to the various places where you might have photos stored. Find the photo you want to check and press on it.
- The app will then search for online versions of the photo, using Google as the default. If you want to use another search engine once the search is complete, press the small square box with an arrow in the middle below the first hit. You will then have the option to use Bing or Yandex, a powerful search engine focused on Russia and Eastern Europe.
- Now dig through the hits and look for previous uses of the photo, the date when it was first used, and the context in which it was used.
Fake Image Detector
This app operates at two levels when checking the provenance and veracity of an image. The first is what its creators call “error level analysis” — essentially, it examines an image’s compression ratio to see whether part of it has been tampered with. The other is metadata, the “behind-the-scenes” data that’s automatically embedded when you snap a photo.
Tip: This tool only works for Android, but Veracity is a good tool for iPhone users. It’s available for free from the Apple app store, so it’s safe to use.
How to Use Fake Image Detector
To start using the app, download and install the Fake Image Detector app from the Chrome or Firefox app stores. Then open the app and select one of two options:
- Choose from Gallery; this provides access to places where photos are stored on your phone so you can perform a reverse image search.
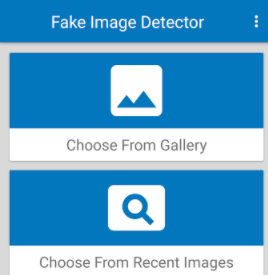
Image: Screenshot
- Choose from Recent Images; select the photograph you’ve taken of a poster or a picture in a magazine or newspaper.
- You will either get a response stating “Digitally Altered,” “Not from Camera,” “50-50 Chance,” or “Like a Real Camera Image.” Be aware that this is just an indication that something is up and that you need to proceed with caution.
- Below each response, you’ll find metadata about your picture. The most important information to look for, if it hasn’t been stripped out, is the date and time of the original, which will tell you when it was taken.
Tips for Verifying Photos
Along with the skills you’ve honed as a reporter, here are some questions to ask when faced with an image that may or may not be genuine:
- Are you looking at the original version of a photo?
- When was it first used and does this usage predate the one you are verifying?
- What is the context in which it was originally used? Be aware that genuine, unedited photos are often used out of context with the intention to mislead.
- Do you know who took the photo? Knowing who took it means you may be able to contact them to ask for further information and context.
- Do you know where the photo was taken? What are people wearing? Do their clothes fit the style of the country where the picture was supposedly shot?
- Look for traffic signs and other signage, writing on shop windows and billboards, registration plates, and anything else that may help you work out where the photo was taken.
- What is the weather like in the photo? If you know the date a photo was taken, use WolframAlpha to search for the prevailing weather conditions on that day to see if it matches the conditions in the photo.
- Look for inconsistent lighting in the photo. Are objects close to one another lit in the same way or do some seem brighter or duller? If so, there’s a good chance they’ve been added or digitally manipulated.
- Do people or objects or people in the photo have blurred outlines? If so, this may be an indication that it may have been manipulated.
- Check out the shadows. Often, especially with poorly manipulated photos where something has been added, shadows are left out as they are difficult to create.
- Look out for non-standard image shapes or sizes. It is often an indication that the photo has been edited to remove important context.
- In nature, there are always subtle variations of light and color. If large areas of a photo are identical in color it might indicate that image manipulation software has been used to duplicate, add, or remove something.
- If you’re looking at a reasonably sharp photo with more than one person in it, look at their eyes to see if the light reflected in them is consistent.
A key question for us all, whether we’re studying an image as a reporter or an ordinary citizen, is: Do you know the intent of the person who shot the photo? Does the photo make you sad or angry, or evoke other strong feelings? Manipulated or out-of-context photos are often intended to play on peoples’ emotions.
The bottom line? If you’re not sure, don’t share. You can be part of the solution to “fake news,” or part of the problem.
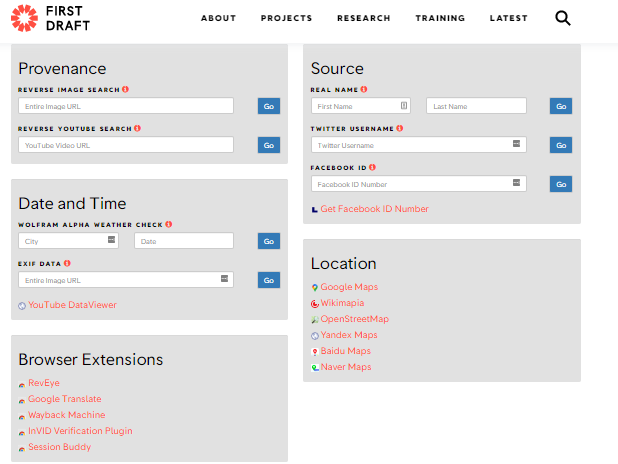
FirstDraftNews’ Verification Toolbox helps you easily check the provenance of photos and YouTube videos. Image: Screenshot
Resources
Here are a few more reverse image search tools worth checking out:
- FirstDraftNews’ Verification Toolbox helps you easily check the provenance of photos and YouTube videos. You’ll find useful fact-checking tools and resources on the FirstDraftNews website, including a video about photo manipulation and a downloadable resource for verifying photos.
- Google’s Fact Check Explorer is a keyword search to find fact-checks related to a person or topic.
- The FullFact guide on how to spot misleading and manipulated online images.
- How-To Geek’s guide on how to tell if a photo has been photoshopped or manipulated.
- GIJN’s round-up on fact-checking and verification also includes key resources for video and image verification.
Additional Reading
Advanced Guide on Verifying Video Content
GIJN Toolbox: Tracking Names and Websites, Verifying Video, a Clustering Search Engine
The Daily Quiz That Teaches Journalists How to Geolocate Images
3 Quick Ways to Verify Images on a Smartphone
 Raymond Joseph is a freelance journalist and journalism trainer. He is a recipient of the 2021 Nat Nakasa Community Journalism Award for Courageous Journalism. He offers training to journalists in online and social media content verification and is an assessor for the Poynter-hosted International Fact-Checking Network.

Simple Tips for Verifying if a Tweet Screenshot Is Real or Fake

10 Lessons from Bellingcat’s Logan Williams on Digital Forensic Techniques

A Guide to Fact-Checking Investigative Stories

Advanced Guide on Verifying Video Content

How Tai Nalon Creates New Tools to Investigate and Fact-Check Brazilian Politics

10 Simple Data Errors That Can Ruin an Investigation
Lessons from a Retracted Investigation in India: How to Avoid Fabricated Evidence
New Technology and Online Resources to Conduct Investigations With Old Photos

This work is licensed under a Creative Commons Attribution-NoDerivatives 4.0 International License
Republish our articles for free, online or in print, under a Creative Commons license.
Republish this article
This work is licensed under a Creative Commons Attribution-NoDerivatives 4.0 International License
Read Next
Case Studies Reporting Tools & Tips
How Tai Nalon Creates New Tools to Investigate and Fact-Check Brazilian Politics
For GIJN’s My Favorite Tools series we spoke with Brazilian journalist Tai Nalon, executive director and co-founder of the fact-checking website Aos Fatos, who now leads an award-winning reporting team of nearly 20 people.
Methodology Reporting Tools & Tips
10 Simple Data Errors That Can Ruin an Investigation
At the 2023 NICAR conference, GIJN talked with several data journalism experts and learned 10 simple data journalism errors to avoid that could ruin your investigation.
News & Analysis Reporting Tools & Tips
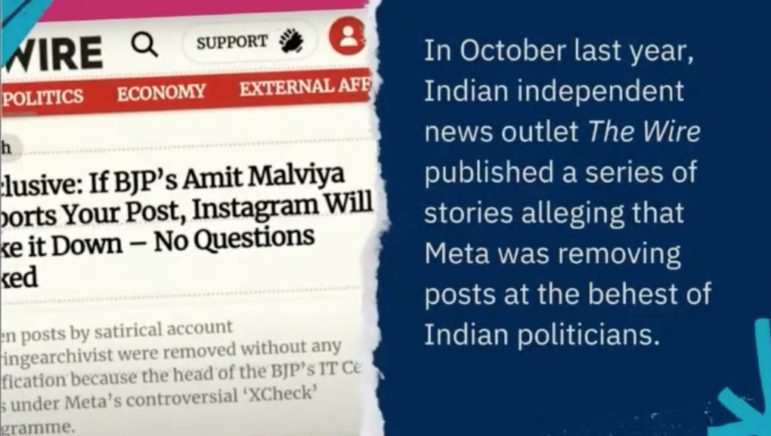
Lessons from a Retracted Investigation in India: How to Avoid Fabricated Evidence
A recent Reuters Institute webinar dug into a highly embarrassing, retracted investigation by India’s The Wire and also laid out best practices for investigative newsrooms to avoid both deliberate and unintentional source errors.
Methodology Reporting Tools & Tips
New Technology and Online Resources to Conduct Investigations With Old Photos
Bellingcat’s Foeke Postma offers tips and tools for using new technology and online resources to investigate old photographs.